Lab Runbook: Configure Server-Based Authentication with TACACS+ and RADIUS
A step-by-step command reference for completing Cisco NetAcad Network Defense Lab 3.4.5 in Packet Tracer. Covers TACACS+ configuration on R2 and RADIUS configuration on R3, with full command sets, expected outputs, and troubleshooting notes.
title: "Lab Runbook: Configure Server-Based Authentication with TACACS+ and RADIUS" description: "A step-by-step command reference for completing Cisco NetAcad Network Defense Lab 3.4.5 in Packet Tracer. Covers TACACS+ configuration on R2 and RADIUS configuration on R3, with full command sets, expected outputs, and troubleshooting notes." date: "2026-05-04" category: "Networking" tags: ["TACACS+", "RADIUS", "AAA", "Cisco", "Packet Tracer", "Network Defense", "Authentication"] author: "Stephen Nnamani" readingTime: "10 min" image: "/images/blog/Cisco-Network-Defense-3.4.5-Packet-Tracer-TACACS=-RADIUS-Network-Topology.png"
About This Runbook
This is a step-by-step breakdown of the tasks required to complete Lab 3.4.5: Packet Tracer - Configure Server-Based Authentication with TACACS+ and RADIUS from the Cisco NetAcad Network Defense course. It is intended to help students who are struggling to work through the lab independently.
This runbook is text-only and will not be accompanied by a video explanation. It focuses purely on the commands and configuration sequence needed to reach a 100% score.
Educational Use Notice: This document is produced for non-profit and educational purposes only. All lab content, topology, and objectives are the intellectual property of Cisco Systems / Cisco Networking Academy. This runbook is shared in the spirit of peer learning and is not intended for commercial use.
Credits: Lab content sourced from Cisco Networking Academy (NetAcad), Network Defense course. Shared with fellow students of the Per Scholas cybersecurity programme.
Network Topology
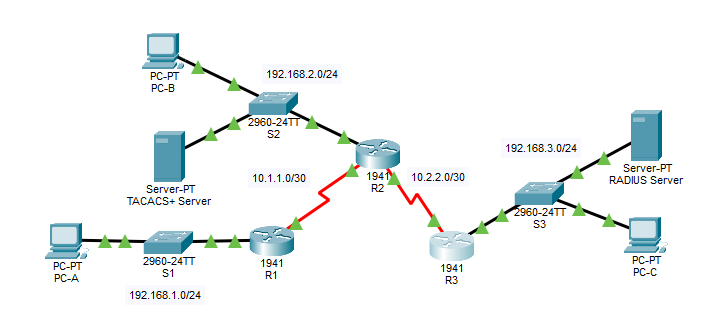
Three routers (R1, R2, R3) connected in series via serial links. R2 connects to a TACACS+ server on its LAN. R3 connects to a RADIUS server on its LAN. PC-A is on R1's LAN; PC-B on R2's; PC-C on R3's.
Addressing Table
| Device | Interface | IP Address | Subnet Mask | Default Gateway | Switch Port | |---|---|---|---|---|---| | R1 | G0/1 | 192.168.1.1 | 255.255.255.0 | N/A | S1 F0/1 | | R1 | S0/0/0 (DCE) | 10.1.1.2 | 255.255.255.252 | N/A | N/A | | R2 | G0/0 | 192.168.2.1 | 255.255.255.0 | N/A | S2 F0/2 | | R2 | S0/0/0 | 10.1.1.1 | 255.255.255.252 | N/A | N/A | | R2 | S0/0/1 (DCE) | 10.2.2.1 | 255.255.255.252 | N/A | N/A | | R3 | G0/1 | 192.168.3.1 | 255.255.255.0 | N/A | S3 F0/5 | | R3 | S0/0/1 | 10.2.2.2 | 255.255.255.252 | N/A | N/A | | TACACS+ Server | NIC | 192.168.2.2 | 255.255.255.0 | 192.168.2.1 | S2 F0/6 | | RADIUS Server | NIC | 192.168.3.2 | 255.255.255.0 | 192.168.3.1 | S3 F0/1 | | PC-A | NIC | 192.168.1.3 | 255.255.255.0 | 192.168.1.1 | S1 F0/2 | | PC-B | NIC | 192.168.2.3 | 255.255.255.0 | 192.168.2.1 | S2 F0/1 | | PC-C | NIC | 192.168.3.3 | 255.255.255.0 | 192.168.3.1 | S3 F0/18 |
Pre-Configured Credentials (Already in the Lab File)
| Item | Value | IOS Command Used |
|---|---|---|
| Router enable secret | ciscoenpa55 | enable secret ciscoenpa55 |
| OSPF MD5 password | MD5pa55 | area 0 authentication message-digest on the OSPF process, then ip ospf message-digest-key 1 md5 MD5pa55 on each participating interface |
| TACACS+ client key (R2) | tacacspa55 | Configured on the TACACS+ server GUI (Network Configuration panel) — no router CLI command pre-applied |
| TACACS+ user account | Admin2 / admin2pa55 | Configured on the TACACS+ server GUI (User Setup panel) — no router CLI command pre-applied |
| RADIUS client key (R3) | radiuspa55 | Configured on the RADIUS server GUI (Network Configuration panel) — no router CLI command pre-applied |
| RADIUS user account | Admin3 / admin3pa55 | Configured on the RADIUS server GUI (User Setup panel) — no router CLI command pre-applied |
Note: Console and VTY lines are NOT pre-configured. You will configure them as part of this lab.
Objectives
- Configure server-based AAA authentication using TACACS+ on R2
- Verify TACACS+ authentication from PC-B
- Configure server-based AAA authentication using RADIUS on R3
- Verify RADIUS authentication from PC-C
Part 1: Configure Server-Based AAA Authentication Using TACACS+ on R2
Step 1: Test Connectivity
Open the command prompt on each PC and verify end-to-end reachability.
On PC-A:
ping 192.168.2.3
ping 192.168.3.3
On PC-B:
ping 192.168.3.3
Expected output: All pings should succeed with replies. If any fail, OSPF routing may not be running correctly. Do not proceed until all pings succeed.
Step 2: Configure a Backup Local User Account on R2
This creates a local fallback account in case the TACACS+ server is unreachable.
Click on R2 in Packet Tracer and open the CLI tab. Enter the following:
R2> enable
Password: ciscoenpa55

R2# configure terminal

R2(config)# username Admin2 secret admin2pa55
What this does: Creates a local user named Admin2 with an encrypted password. This is the fallback if the TACACS+ server goes down.
Step 3: Verify the TACACS+ Server Configuration (GUI Check)
- Click the TACACS+ Server in the topology (IP: 192.168.2.2)
- Click the Services tab at the top
- Click AAA in the left panel
You should see:
- Under Network Configuration: a client entry for R2 with IP
192.168.2.1and keytacacspa55 - Under User Setup: a user
Admin2with passwordadmin2pa55
What to look for: If these entries are not there, the server has not been pre-configured correctly. In a working lab they should already be present.
Step 4: Configure the TACACS+ Server on R2
Still on R2 CLI, configure the IP address and shared secret key of the TACACS+ server:
R2(config)# tacacs-server host 192.168.2.2
R2(config)# tacacs-server key tacacspa55
What this does:
tacacs-server hosttells R2 where to send authentication requests (the TACACS+ server IP)tacacs-server keysets the shared secret that must match what is configured on the server
Note: These are legacy commands kept in Packet Tracer. In real IOS, the newer command is
tacacs serverbut Packet Tracer does not support it yet.
Step 5: Enable AAA and Configure Authentication Method on R2
Enable the AAA framework and define the default login authentication method:
R2(config)# aaa new-model
R2(config)# aaa authentication login default group tacacs+ local
What this does:
aaa new-modelactivates the AAA security model on R2. This is required before any AAA commands work.aaa authentication login default group tacacs+tells R2 to authenticate all login attempts using the TACACS+ server first.localat the end means: if the TACACS+ server is unreachable, fall back to the local username database (Admin2 that you created in Step 2).
Step 6: Apply the AAA Authentication Method to the Console Line
Configure the console line to use the AAA default authentication method:
R2(config)# line console 0
R2(config-line)# login authentication default
R2(config-line)# end
What this does: Applies the AAA authentication policy to console access. Without this, the console line would still use its old authentication method (or none at all).
Save your configuration:
R2# copy running-config startup-config
Step 7: Verify TACACS+ Authentication on R2
To test from the R2 console, exit back to the login prompt:
R2# exit
You should now be prompted for a username and password.
Username: Admin2
Password: admin2pa55
Expected result: You are logged in successfully as Admin2. This confirms that R2 is authenticating against the TACACS+ server (or local database as fallback).
If authentication fails: Double-check that the TACACS+ server IP is reachable. Ping 192.168.2.2 from R2:
R2# ping 192.168.2.2
Part 2: Configure Server-Based AAA Authentication Using RADIUS on R3
Step 1: Configure a Backup Local User Account on R3
Click on R3 in the topology and open the CLI tab:
R3> enable
Password: ciscoenpa55

R3# configure terminal

R3(config)# username Admin3 secret admin3pa55
What this does: Creates the local fallback user Admin3 in case the RADIUS server is unavailable.
Step 2: Verify the RADIUS Server Configuration (GUI Check)
- Click the RADIUS Server in the topology (IP: 192.168.3.2)
- Click the Services tab
- Click AAA in the left panel
You should see:
- Under Network Configuration: a client entry for R3 with IP
192.168.3.1and keyradiuspa55 - Under User Setup: a user
Admin3with passwordadmin3pa55
What to look for: Both entries must be present for RADIUS authentication to work.
Step 3: Configure the RADIUS Server on R3
R3(config)# radius-server host 192.168.3.2
R3(config)# radius-server key radiuspa55
What this does:
radius-server hostpoints R3 to the RADIUS server IPradius-server keysets the shared secret matching what is on the RADIUS server
Note: Same note as TACACS+: these are legacy commands kept for Packet Tracer compatibility.
Step 4: Enable AAA and Configure Authentication Method on R3
R3(config)# aaa new-model
R3(config)# aaa authentication login default group radius local
What this does:
aaa new-modelactivates AAA on R3group radiustells R3 to authenticate logins through the RADIUS server firstlocalis the fallback if RADIUS is unreachable
Step 5: Apply the AAA Authentication Method to the Console Line
R3(config)# line console 0
R3(config-line)# login authentication default
R3(config-line)# end
Save your configuration:
R3# copy running-config startup-config
Step 6: Verify RADIUS Authentication on R3
Exit to the login prompt on R3:
R3# exit
When prompted:
Username: Admin3
Password: admin3pa55
Expected result: Successful login confirms R3 is authenticating via the RADIUS server.
If authentication fails: Verify RADIUS server is reachable from R3:
R3# ping 192.168.3.2
Quick Reference: TACACS+ vs RADIUS
| Feature | TACACS+ | RADIUS | |---|---|---| | Protocol | TCP port 49 | UDP ports 1812/1813 | | Encryption | Encrypts entire payload | Encrypts password only | | AAA separation | Separates Authentication, Authorization, Accounting | Combines Authentication and Authorization | | Used for | Device administration (routers, switches) | Network access (VPN, wireless) | | Server IP in this lab | 192.168.2.2 | 192.168.3.2 | | Configured on | R2 | R3 |
Complete Command Summary
R2 (TACACS+)
enable
configure terminal
username Admin2 secret admin2pa55
tacacs-server host 192.168.2.2
tacacs-server key tacacspa55
aaa new-model
aaa authentication login default group tacacs+ local
line console 0
login authentication default
end
copy running-config startup-config
R3 (RADIUS)
enable
configure terminal
username Admin3 secret admin3pa55
radius-server host 192.168.3.2
radius-server key radiuspa55
aaa new-model
aaa authentication login default group radius local
line console 0
login authentication default
end
copy running-config startup-config
Completion Check
When done, click Check Results in the lab interface. Your score should be 100%.
If not 100%, the most common issues are:
aaa new-modelnot entered before the authentication commands- Wrong shared key (key must match exactly what the server has)
login authentication defaultmissing fromline console 0- Forgot to create the local backup user account